
Getting Started
Lesson 2 - Adding Motion
First we're going to add the code to create five Position keyframes, evenly spaced in time at one second apart. Let's take a look at the code:
myComp = app.project.item(1);
mySolid = myComp.layers.addSolid([1.0,1.0,0], "my square", 50, 50, 1);

newMask = mySolid.Masks.addProperty("Mask");
newMask.inverted = true;
myMaskShape = newMask.property("maskShape");
myShape = myMaskShape.value;
myShape.vertices = [[5,5],[5,45],[45,45],[45,5]];
myShape.closed = true;
myMaskShape.setValue(myShape);

myPosition = mySolid.property("position");
myPosition.setValueAtTime(0,[80,30]);
myPosition.setValueAtTime(1,[130,60]);
myPosition.setValueAtTime(2,[80,90]);
myPosition.setValueAtTime(3,[30,60]);
myPosition.setValueAtTime(4,[80,30]);
After you run the script, you should see something like this:
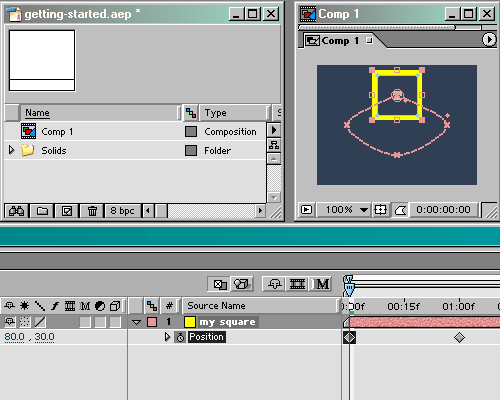
As you can see, Position keyframes have been added and our square now has a motion path that loops around the comp.
Let's take a closer look at the first line of new code:
myPosition = mySolid.property("position");
In this line, we're defining a new variable/object named "myPosition" and setting it equal to the Position property of our square. The next five lines are where the actual keyframes get defined. Here they are again:
myPosition.setValueAtTime(0,[80,30]);
myPosition.setValueAtTime(1,[130,60]);
myPosition.setValueAtTime(2,[80,90]);
myPosition.setValueAtTime(3,[30,60]);
myPosition.setValueAtTime(4,[80,30]);
The magic here is performed by the "setVaueAtTime" method. It takes two arguments - time and the value of the property at that time. It creates a keyframe at the time specified for the value specified. So, for example, our first keyframe is created at time zero with a Position value of x = 80, y = 30. In the code above, we create keyframes every second, moving the square in a clockwise direction around the comp until, finally, the fifth keyframe returns the square to its starting position of [80,30].
So, to summarize, this section of code creates an object named "myPosition" and uses it with the "setValueAtTime" method to set position keyframes.
Adding Rotation
Let's add some more code:
myComp = app.project.item(1);
mySolid = myComp.layers.addSolid([1.0,1.0,0], "my square", 50, 50, 1);

newMask = mySolid.Masks.addProperty("Mask");
newMask.inverted = true;
myMaskShape = newMask.property("maskShape");
myShape = myMaskShape.value;
myShape.vertices = [[5,5],[5,45],[45,45],[45,5]];
myShape.closed = true;
myMaskShape.setValue(myShape);

myPosition = mySolid.property("position");
myPosition.setValueAtTime(0,[80,30]);
myPosition.setValueAtTime(1,[130,60]);
myPosition.setValueAtTime(2,[80,90]);
myPosition.setValueAtTime(3,[30,60]);
myPosition.setValueAtTime(4,[80,30]);

myRotation = mySolid.property("rotation");
myRotation.setValueAtTime(0,0);
myRotation.setValueAtTime(4,720);
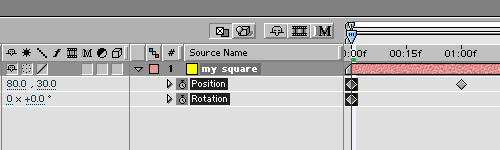
After you run this script, you'll notice that we now have Rotation keyframes.
You can see that the new code looks very similar to the code we added to create Position keyframes except that this time we're creating a new variable named "myRotation" that will give us access to the square's rotation property:
myRotation = mySolid.property("rotation");
myRotation.setValueAtTime(0,0);
myRotation.setValueAtTime(4,720);
Here we're only creating two Rotation keyframes - one at time zero to set the initial Rotation value to zero and another at four seconds to set the Rotation value to 720 degrees (two complete revolutions). It's getting easier, right?
Animating Scale
Let's move on to Scale. Here's the revised code:
myComp = app.project.item(1);
mySolid = myComp.layers.addSolid([1.0,1.0,0], "my square", 50, 50, 1);

newMask = mySolid.Masks.addProperty("Mask");
newMask.inverted = true;
myMaskShape = newMask.property("maskShape");
myShape = myMaskShape.value;
myShape.vertices = [[5,5],[5,45],[45,45],[45,5]];
myShape.closed = true;
myMaskShape.setValue(myShape);

myPosition = mySolid.property("position");
myPosition.setValueAtTime(0,[80,30]);
myPosition.setValueAtTime(1,[130,60]);
myPosition.setValueAtTime(2,[80,90]);
myPosition.setValueAtTime(3,[30,60]);
myPosition.setValueAtTime(4,[80,30]);

myRotation = mySolid.property("rotation");
myRotation.setValueAtTime(0,0);
myRotation.setValueAtTime(4,720);

myScale = mySolid.property("scale");
myScale.setValueAtTime(0,[100,100]);
myScale.setValueAtTime(1,[50,50]);
myScale.setValueAtTime(2,[100,100]);
myScale.setValueAtTime(3,[50,50]);
myScale.setValueAtTime(4,[100,100]);
When you run this new version of the script, you should see something like this:
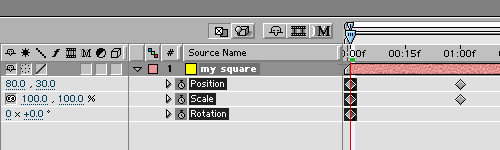
Notice that we now have keyframes for Scale.
Here's the new code:
myScale = mySolid.property("scale");
myScale.setValueAtTime(0,[100,100]);
myScale.setValueAtTime(1,[50,50]);
myScale.setValueAtTime(2,[100,100]);
myScale.setValueAtTime(3,[50,50]);
myScale.setValueAtTime(4,[100,100]);
This should be starting to look very familiar. Here we're defining a new variable "myScale" to allow us to access our square's Scale property and then were setting five keyframes that ramp the layer's scale between 100% and 50% for four seconds.
Animating Opacity
Just for the sake of completeness, let's throw in some keyframes for Opacity. Here's the updated code:
myComp = app.project.item(1);
mySolid = myComp.layers.addSolid([1.0,1.0,0], "my square", 50, 50, 1);

newMask = mySolid.Masks.addProperty("Mask");
newMask.inverted = true;
myMaskShape = newMask.property("maskShape");
myShape = myMaskShape.value;
myShape.vertices = [[5,5],[5,45],[45,45],[45,5]];
myShape.closed = true;
myMaskShape.setValue(myShape);

myPosition = mySolid.property("position");
myPosition.setValueAtTime(0,[80,30]);
myPosition.setValueAtTime(1,[130,60]);
myPosition.setValueAtTime(2,[80,90]);
myPosition.setValueAtTime(3,[30,60]);
myPosition.setValueAtTime(4,[80,30]);

myRotation = mySolid.property("rotation");
myRotation.setValueAtTime(0,0);
myRotation.setValueAtTime(4,720);

myScale = mySolid.property("scale");
myScale.setValueAtTime(0,[100,100]);
myScale.setValueAtTime(1,[50,50]);
myScale.setValueAtTime(2,[100,100]);
myScale.setValueAtTime(3,[50,50]);
myScale.setValueAtTime(4,[100,100]);

myOpacity = mySolid.property("opacity");
myOpacity.setValueAtTime(0,100);
myOpacity.setValueAtTime(1,50);
myOpacity.setValueAtTime(2,100);
myOpacity.setValueAtTime(3,50);
myOpacity.setValueAtTime(4,100);
After you run the new version of the script you should see something like this:
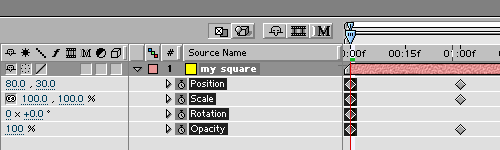
You can see that Opacity keyframes have been added.
Here's the new code:
myOpacity = mySolid.property("opacity");
myOpacity.setValueAtTime(0,100);
myOpacity.setValueAtTime(1,50);
myOpacity.setValueAtTime(2,100);
myOpacity.setValueAtTime(3,50);
myOpacity.setValueAtTime(4,100);
You'll notice that the code for Opacity is very similar to the code for Scale. Here we're just setting Opacity keyframes to ramp Opacity between 100% and 50% over a period of four seconds.
OK - that wraps it up for this lesson. In the next lesson we'll take a look at some boring but important housekeeping issues. Then we'll get back to the fun stuff.
| next |